Twitter Slide Menu
We will breakdown, analyze the Slide Menu mechanism of Twitter app, and try to replicate it using Auto Layout and Container View. No third party library is used in this project.
Main screen of Twitter app consist of a tab view controller. If you swipe right, a side menu will appear.

When the side menu is open, both side menu view and tab bar view appear in the same screen. The screen (which is a view controller) contain both of the side menu view controller and tab bar view controller :
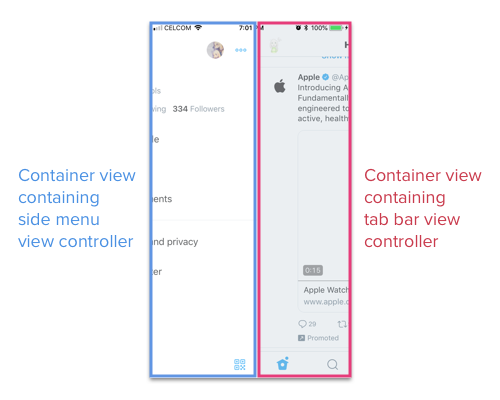
We can achieve this using two container view in the Main View Controller.
You can download the Slide Menu Starter project here.
The steps below will start from the starter project.
Setup Container View for Tab bar controller
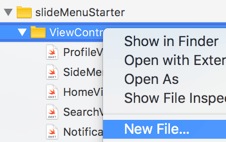
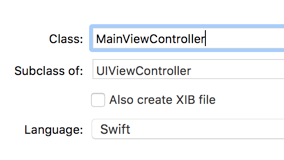
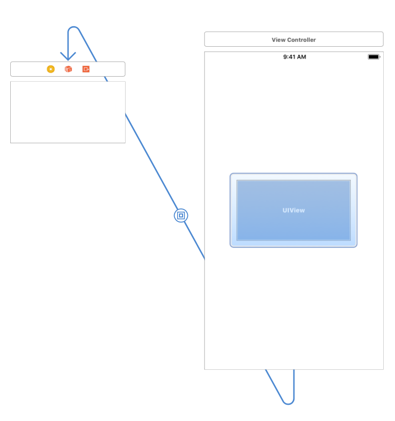
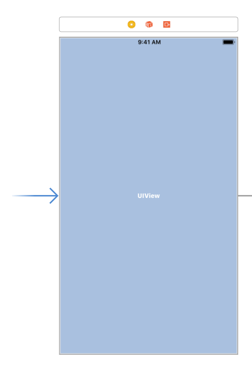
To accomodate the side menu and tab bar controllers, we will create a new view controller in storyboard named MainViewController , and drag a container view to it.
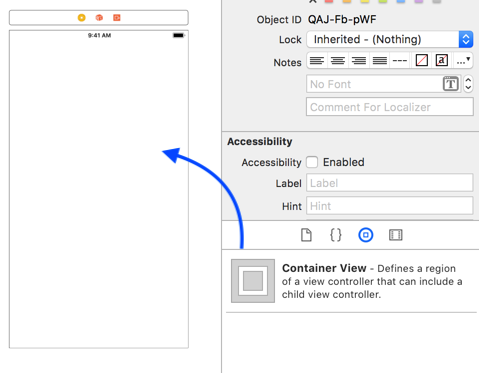
After dragging, you will see that Xcode auto link a new view controller to the Container view. We don't need this new controller, select the link (segue) and press delete to remove the link, then delete the attached view controller.
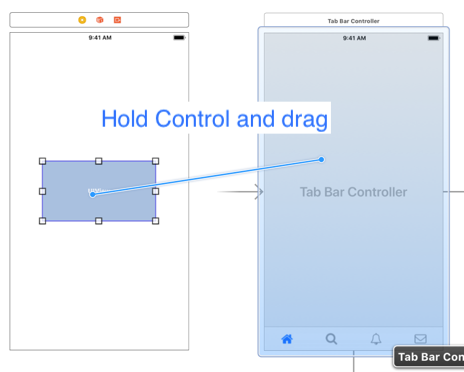
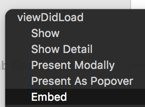
Then we will link the container view to the tab bar view controller. Select the Container view, then hold control and drag it to the tab bar controller. Select "Embed".
You might see the tab bar controller shrinked to match the container view size 😱, no worries, we will add some constraint to the container view so that it will match the screen size.
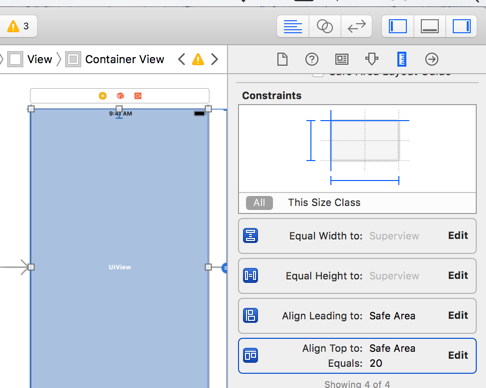
Let's create a leading space 0 , top space 0, equal width and equal height constraints for the container view (to its parent view) like this :
Select the container view, Hold control and drag to its parent view. Then once the list of constraints appear, hold shift to select multiple constraints, then click 'Add Constraints' once you are done.
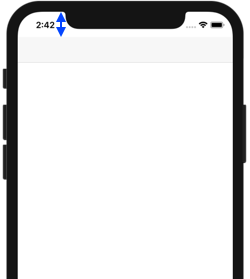
As by default Xcode align the top / bottom constraint to Safe Area, the container view will have some margin on top when viewed in iPhone X / XR / XS :
We want the container view to align to the screen top, not safe area, hence we will need to edit the constraint.
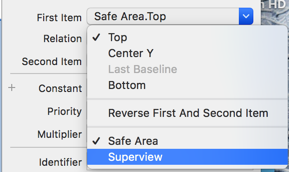
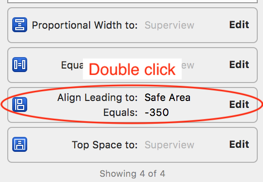
Select the container view and double click its Align Top constraint :
Change the "Safe Area" in First/Second Item to "Superview", and then set the constant to 0 .
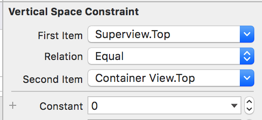
After adjusting the top constraint, remember to set the constant of leading constraint to 0 as well.
Set the MainViewController as the initial view controller.
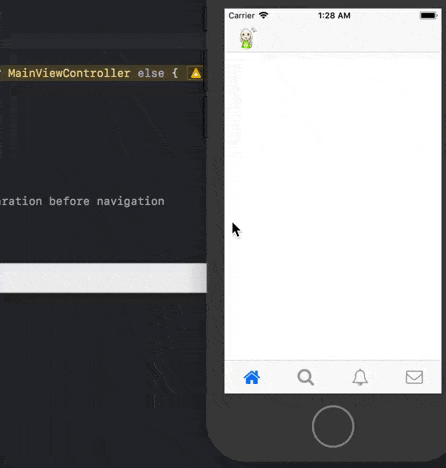
Build and run the app, you now should have a container view containing the tab bar controller 🙌.
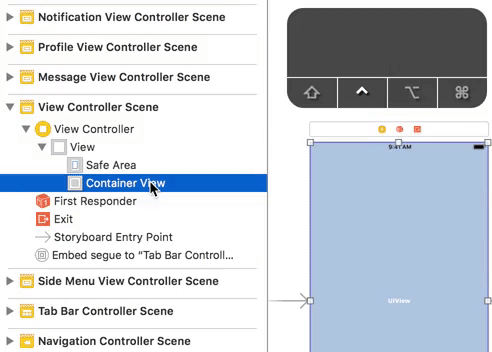
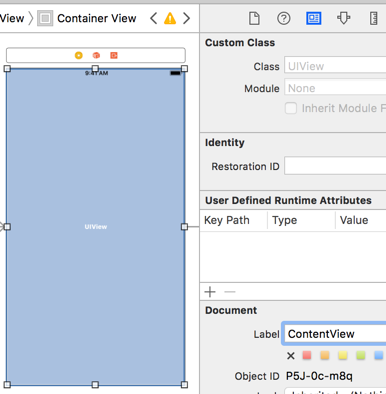
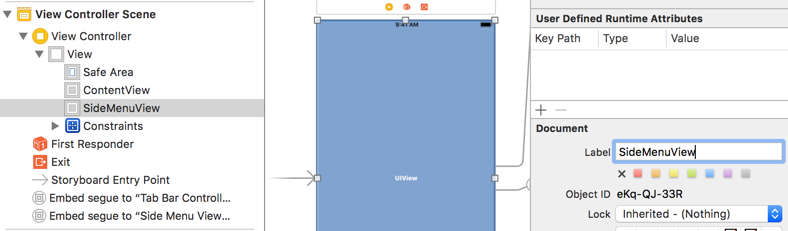
As we will add another container view for side menu later on, we should give a label to the tab bar container view so we can identify it later. Let's label it as ContentView.
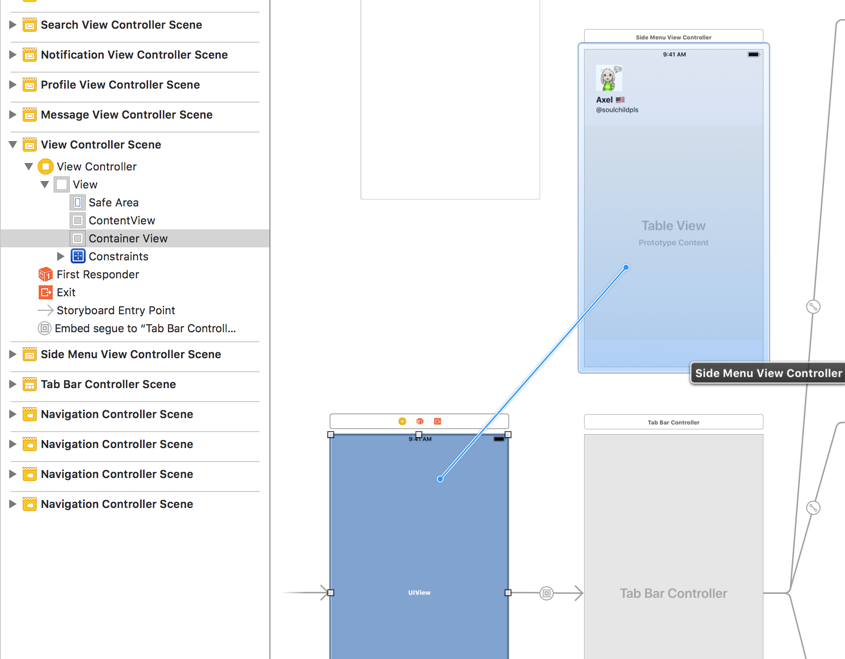
Setup Container View for Side Menu View Controller
Similar to previous section, drag another container view to MainViewController, link it to the side menu view controller, setup constraints (top 0, leading 0, equal width and equal height) and change the safe area to superview.
Add a label to this container view, we will label it as SideMenuView.
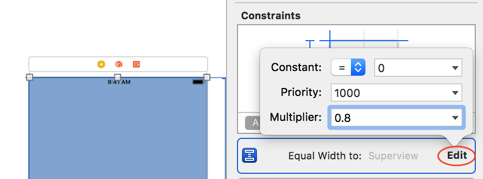
As we want the width of side menu to be 80% of screen width (so the side menu won't cover the whole screen when opened), we will change its equal width constraint to equal 80% of its parent view's width.
Select SideMenuView , then click on 'Edit' on its Equal width constraint, change the multipler to 0.8 . This will make the side menu view width to be 80% of its parent view.
Build and run the app, you should see the side menu is overlapping the tab bar controller like this :
Now we have two container view on the main view controller 🙌!
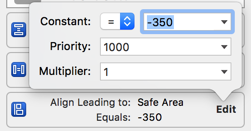
As we are going to setup the top left profile button in the next step, let's move the side menu to the left so the tab bar controller is visible. We will set the leading constraint value of the side menu container to -350 for now.
Later we will create outlet for the leading constraints of these two container view so we can manipulate their horizontal position.
Setup top left profile button
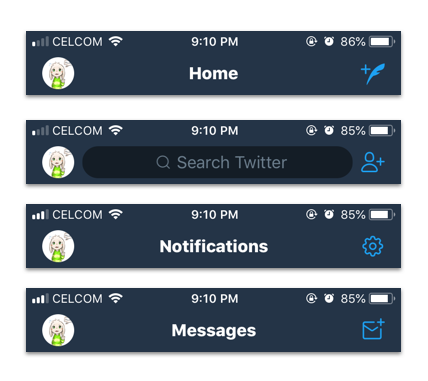
Notice that for every tab in the tab bar controller, they have the same top left profile button (the rounded avatar on top left) like this :
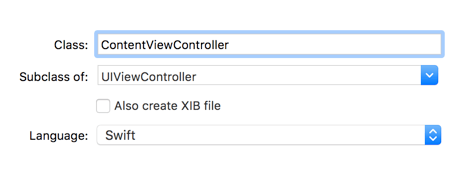
To reduce the repeating work of creating the top left button for each of the tab, we can create a View Controller class named 'ContentViewController', and then subclass view controller in each tab to it.
We will add the following code to the ContentViewController.swift to create the left top profile button :
class ContentViewController: UIViewController { let profileButton = UIButton(type: .custom) override func viewDidLoad() { super.viewDidLoad() // Do any additional setup after loading the view. profileButton.setImage(UIImage(named: "Avatar") , for: .normal) profileButton.contentMode = .scaleAspectFit profileButton.translatesAutoresizingMaskIntoConstraints = false // function performed when the button is tapped profileButton.addTarget(self, action: #selector(profileButtonTapped(_:)), for: .touchUpInside) // Add the profile button as the left bar button of the navigation bar let barbutton = UIBarButtonItem(customView: profileButton) self.navigationItem.leftBarButtonItem = barbutton // Set the width and height for the profile button NSLayoutConstraint.activate([ profileButton.widthAnchor.constraint(equalToConstant: 35.0), profileButton.heightAnchor.constraint(equalToConstant: 35.0) ]) // Make the profile button become circular profileButton.layer.cornerRadius = 35.0 / 2 profileButton.clipsToBounds = true } @IBAction func profileButtonTapped(_ sender: Any){ }}
And then we replace the UIViewController subclass to ContentViewController subclass for HomeViewController, SearchViewController, NotificationViewController and MessageViewController.
// HomeViewController.swift// Change the UIViewController to ContentViewControllerclass HomeViewController: ContentViewController { ...}// SearchViewController.swift// Change the UIViewController to ContentViewControllerclass SearchViewController: ContentViewController { ...}// NotificationViewController.swift// Change the UIViewController to ContentViewControllerclass NotificationViewController: ContentViewController { ...}// MessageViewController.swift// Change the UIViewController to ContentViewControllerclass MessageViewController: ContentViewController { ...}
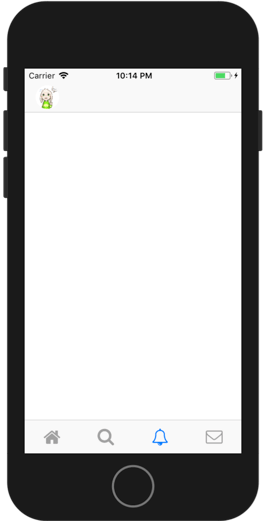
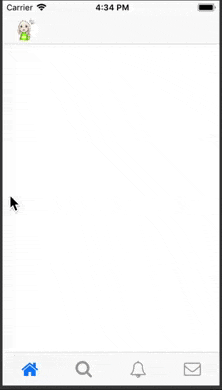
Build and run the app, we have a top left profile button for each tab now 👌!
Create outlet for constraints
To be able to modify the constraint value in code, we need to create and link outlet of constraint to the MainViewController.
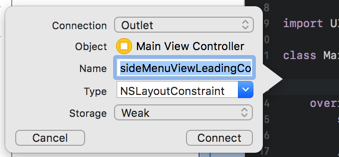
Select the Side Menu Container View in storyboard, double click the leading constraint, then hold control + drag the highlighted constraint to the view controller. Name the outlet as sideMenuViewLeadingConstraint.
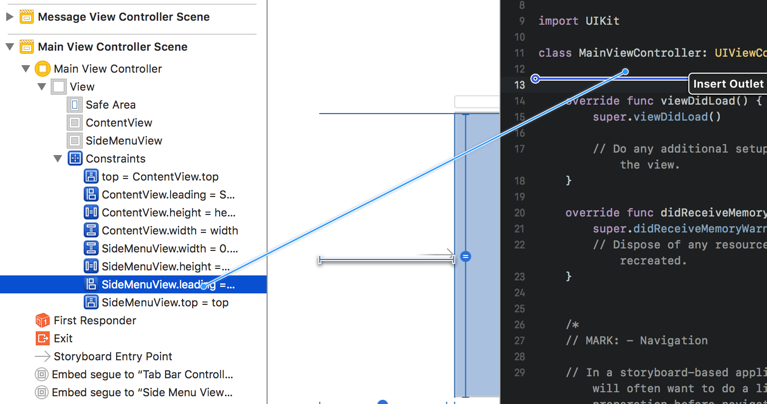
Repeat the same step for the leading constraint of Tab Bar Container View (ContentView), and name the outlet as contentViewLeadingConstraint.
Create an outlet for the Side Menu Container View, name it as sideMenuContainer .
Your MainViewController.swift should look like this now :
class MainViewController: UIViewController { @IBOutlet weak var sideMenuContainer: UIView! @IBOutlet weak var contentViewLeadingConstraint: NSLayoutConstraint! @IBOutlet weak var sideMenuViewLeadingConstraint: NSLayoutConstraint!...}
Toggle side menu when top left profile button is tapped
When you tap on the top left avatar circle button on Twitter app, the side menu appears if it is not visible yet, or the side menu disappear if it is currently visible. Now we are going to replicate this functionality.
Add a boolean variable to keep track if the side menu is visible on screen.
class MainViewController: UIViewController { @IBOutlet weak var sideMenuContainer: UIView! @IBOutlet weak var contentViewLeadingConstraint: NSLayoutConstraint! @IBOutlet weak var sideMenuViewLeadingConstraint: NSLayoutConstraint! // if side menu is visible var menuVisible = false...}
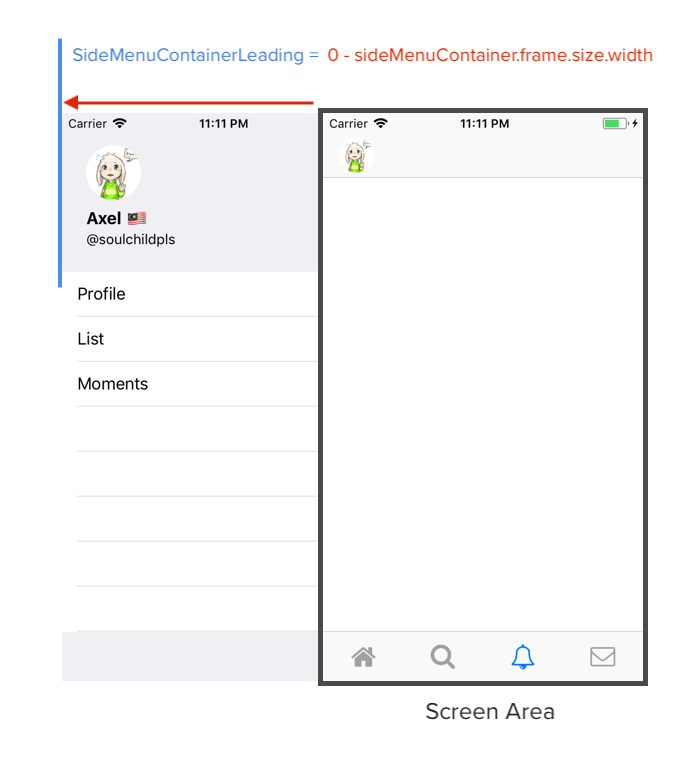
In viewDidLoad, we set the leading constraint of side menu container to negative width of the side menu container. So that the side menu container will be invisible at first.
override func viewDidLoad() { super.viewDidLoad() // Do any additional setup after loading the view. sideMenuContainerLeadingConstraint.constant = 0 - self.sideMenuContainer.frame.size.width}
Next, we will add a function to toggle the side menu :
class MainViewController: UIViewController { @IBOutlet weak var sideMenuContainer: UIView! @IBOutlet weak var contentViewLeadingConstraint: NSLayoutConstraint! @IBOutlet weak var sideMenuViewLeadingConstraint: NSLayoutConstraint! var menuVisible = false ... @objc func toggleSideMenu(fromViewController: UIViewController) { if(menuVisible){ UIView.animate(withDuration: 0.5, animations: { // hide the side menu to the left self.sideMenuViewLeadingConstraint.constant = 0 - self.sideMenuContainer.frame.size.width // move the content view (tab bar controller) to original position self.contentViewLeadingConstraint.constant = 0 self.view.layoutIfNeeded() }) } else { self.view.layoutIfNeeded() UIView.animate(withDuration: 0.5, animations: { // move the side menu to the right to show it self.sideMenuViewLeadingConstraint.constant = 0 // move the content view (tab bar controller) to the right self.contentViewLeadingConstraint.constant = self.sideMenuContainer.frame.size.width self.view.layoutIfNeeded() }) } menuVisible = !menuVisible }
Then in the ContentViewController, we toggle the side menu when the profile button is tapped :
class ContentViewController: UIViewController { ... @IBAction func profileButtonTapped(_ sender: Any){ // current view controller (self) is embed in navigation controller which is embed in tab bar controller // .parent means the view controller that has the container view (ie. MainViewController) if let mainVC = self.navigationController?.tabBarController?.parent as? MainViewController { mainVC.toggleSideMenu(fromViewController: self) } }}Build and run the app, now we have toggle-able side menu 🤘!
In the next section, we will add slide gesture to show/hide menu, and segue to profile view controller when one of the table view row in side menu view controller is tapped.
Create Pan Gesture to detect finger pan
As the side menu will move according to the distance we swiped in the app, we will create a Pan Gesture recognizer to capture the movement of finger on the ContentViewController (which every view controllers in tab bar are subclassed from, so the pan gesture will apply on each of them).
class ContentViewController: UIViewController { override func viewDidLoad() { super.viewDidLoad() // Do any additional setup after loading the view. // profile button stuff here... // gesture recognizer, to detect the gesture and perform action let panGestureRecognizser = UIPanGestureRecognizer(target: self, action: #selector(handlePan(_:)) ) view.addGestureRecognizer(panGestureRecognizser) } // function to handle the pan gesture @objc func handlePan(_ recognizer: UIPanGestureRecognizer){ // how much distance have user finger moved since touch start (in X and Y) let translation = recognizer.translation(in: self.view) // for demonstration purpose below, you can ignore this line print("panned x: \(translation.x), y: \(translation.y)") // the main view controller that have two container view guard let mainVC = self.navigationController?.tabBarController?.parent as? MainViewController else { return } }}
Here's the output of the translation when panned :
When user's finger move right, the translation's X value is positive; when user's finger move left, the translation's X value is negative.
We will add some code to the handlePan function to modify the leading constraint values of Side Menu Container View and Tab bar Container view :
// function to handle the pan gesture@objc func handlePan(_ recognizer: UIPanGestureRecognizer){ let translation = recognizer.translation(in: self.view) // the main view controller that have two container view guard let mainVC = self.navigationController?.tabBarController?.parent as? MainViewController else { return } // if side menu is not visisble // and user finger move to right // and the distance moved is smaller than the side menu's width if(!mainVC.menuVisible && translation.x > 0.0 && translation.x <= mainVC.sideMenuContainer.frame.size.width) { // move the side menu to the right mainVC.sideMenuViewLeadingConstraint.constant = 0 - mainVC.sideMenuContainer.frame.size.width + translation.x // move the tab bar controller to the right mainVC.contentViewLeadingConstraint.constant = 0 + translation.x } // if the side menu is visible // and user finger move to left // and the distance moved is smaller than the side menu's width if(mainVC.menuVisible && translation.x < 0.0 && translation.x >= 0 - mainVC.sideMenuContainer.frame.size.width) { // move the side menu to the left mainVC.sideMenuViewLeadingConstraint.constant = 0 + translation.x // move the tab bar controller to the left mainVC.contentViewLeadingConstraint.constant = mainVC.sideMenuContainer.frame.size.width + translation.x }}
Build and run the app, and try dragging to the right :
When we release the drag / finger , the side menu is stuck on the last position we dragged! 😬 . When you release finger in the middle of drag on the Twitter app, it should continue to move until the menu is fully opened / closed. Next, we will add some code for this 'snap-to-nearest' feature.
Modify the handlePan function to include the 'snap-to-nearest' feature :
// function to handle the pan gesture@objc func handlePan(_ recognizer: UIPanGestureRecognizer){ let translation = recognizer.translation(in: self.view) // the main view controller that have two container view guard let mainVC = self.navigationController?.tabBarController?.parent as? MainViewController else { return } // when user lift up finger / end drag if(recognizer.state == .ended || recognizer.state == .failed || recognizer.state == .cancelled){ if(mainVC.menuVisible){ // user finger moved to left before ending drag if(translation.x < 0){ // toggle side menu (to fully hide it) mainVC.toggleSideMenu(fromViewController: self) } } else { // user finger moved to right and more than 100pt if(translation.x > 100.0){ // toggle side menu (to fully show it) mainVC.toggleSideMenu(fromViewController: self) } else { // user finger moved to right but too less // hide back the side menu (with animation) mainVC.view.layoutIfNeeded() UIView.animate(withDuration: 0.5, animations: { mainVC.sideMenuViewLeadingConstraint.constant = 0 - mainVC.sideMenuContainer.frame.size.width mainVC.contentViewLeadingConstraint.constant = 0 mainVC.view.layoutIfNeeded() }) } } // early return so code below won't get executed return } if(!mainVC.menuVisible && translation.x > 0.0 && translation.x <= mainVC.sideMenuContainer.frame.size.width) { mainVC.sideMenuViewLeadingConstraint.constant = 0 - mainVC.sideMenuContainer.frame.size.width + translation.x mainVC.contentViewLeadingConstraint.constant = 0 + translation.x } if(mainVC.menuVisible && translation.x >= 0 - mainVC.sideMenuContainer.frame.size.width && translation.x < 0.0) { mainVC.sideMenuViewLeadingConstraint.constant = 0 + translation.x mainVC.contentViewLeadingConstraint.constant = mainVC.sideMenuContainer.frame.size.width + translation.x }}
Build and run the app, and try to release while dragging. The side menu should snap to fully open / close position now 🤘.
We have successfully added the swipe to open/close gesture for the side menu, Awesome!
Next, we will add some menu to the side menu's table view, and add action to segue when it is tapped.
Setup before coding the segue
For the segue, we will push the profile view controller to the navigation controller of the selected tab.
The code (no need to type this first, this is just an explanation of what we will do later) :
// SideMenuViewController.swift/* inside tableView didSelectRowAt function */// currentActiveNav is the navigation controller of the selected tabif let currentActiveNav = self.currentActiveNav,let mainVC = self.parent as? MainViewController { // ask the MainViewController (which have the two container view) to hide the sidemenu // side menu view should be hidden after user tap on the menu mainVC.hideSideMenu() // instantiate the Profile View Controller from Storyboard using Identifier let storyboard = UIStoryboard(name: "Main", bundle: nil) let profileVC = storyboard.instantiateViewController(withIdentifier: "ProfileViewController") // push the profile view controller to the navigation controller currentActiveNav.pushViewController(profileVC, animated: true)}
To identify which navigation controller to push the profile view controller to, we will need to create a variable to hold this value. Let's name it currentActiveNav :
class SideMenuViewController: UIViewController { var currentActiveNav : UINavigationController? // ...}
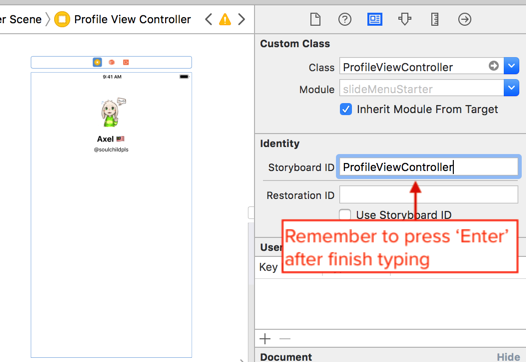
Next, we will need to add an identifier to the profile view controller (or any other controller you want to segue to) in the Storyboard. So that we can instantiate this view controller in code like this : storyboard.instantiateViewController(withIdentifier: "ProfileViewController").
Next, we will implement the hideSideMenu() function in the MainViewController :
class MainViewController: UIViewController { // .. below the toggleSideMenu's function /* its very similar to the toggleSideMenu function, except it doesn't do anything when the side menu is already hidden. And it doesn't have the parameter fromViewController */ func hideSideMenu() { if(menuVisible){ UIView.animate(withDuration: 0.5, animations: { self.sideMenuViewLeadingConstraint.constant = 0 - self.sideMenuContainer.frame.size.width self.contentViewLeadingConstraint.constant = 0 self.view.layoutIfNeeded() }) menuVisible = !menuVisible } }}
Next, we will modify the toggleSideMenu(fromViewController:) function in the MainViewController. We want to set the value of currentActiveNav to the navigation controller of the selected tab when the menu is shown.
@objc func toggleSideMenu(fromViewController: UIViewController) { if(menuVisible){ UIView.animate(withDuration: 0.5, animations: { // hide the side menu to the left self.sideMenuViewLeadingConstraint.constant = 0 - self.sideMenuContainer.frame.size.width // move the content view (tab bar controller) to original position self.contentViewLeadingConstraint.constant = 0 self.view.layoutIfNeeded() }) } else { // set the current active navigation controller // fromViewController is the view controller which called this toggleSideMenu function (view controller of the selected tab) self.sideMenuViewController?.currentActiveNav = fromViewController.navigationController self.view.layoutIfNeeded() UIView.animate(withDuration: 0.5, animations: { // move the side menu to the right to show it self.sideMenuViewLeadingConstraint.constant = 0 // move the content view (tab bar controller) to the right self.contentViewLeadingConstraint.constant = self.sideMenuContainer.frame.size.width self.view.layoutIfNeeded() }) } menuVisible = !menuVisible}
After typing the code above, you will get an error mentioning "Value of type 'MainViewController' has no member 'sideMenuViewController'", this is because we haven't add the sideMenuViewController variable to the MainViewController yet. We will proceed to add it like this. :
class MainViewController: UIViewController { // ... var sideMenuViewController : SideMenuViewController? override func viewDidLoad() { super.viewDidLoad() // Do any additional setup after loading the view. // loop through all of the child view controllers (view controllers inside container views) // and find the side menu view controller and assign it for childViewController in self.childViewControllers { if let sideMenuVC = childViewController as? SideMenuViewController { sideMenuViewController = sideMenuVC break } } sideMenuViewLeadingConstraint.constant = 0 - self.sideMenuContainer.frame.size.width } // ...}We have finished preparing for the setup, next, we will setup the table view and implement the tap action in the side menu.
Setup Table view and row tap action
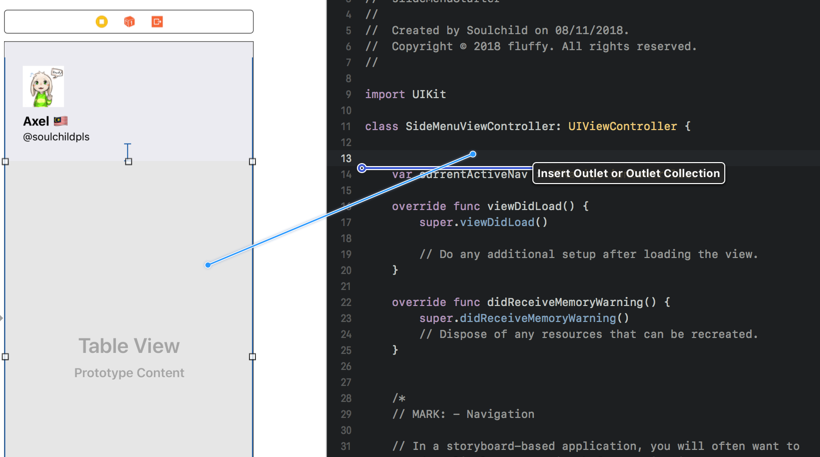
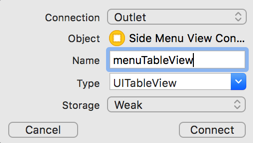
Let's create an outlet for the table view in the side menu view controller (hold control and drag), and name it menuTableView.
Also create a variable cellIdentifier to hold the identifier for cell reuse :
class SideMenuViewController: UIViewController { @IBOutlet weak var menuTableView: UITableView! let cellIdentifier = "cellIdentifier" var currentActiveNav : UINavigationController? //...}
In viewDidLoad, set the table view datasource/ delegate to self :
// SideMenuViewController.swiftoverride func viewDidLoad() { super.viewDidLoad() menuTableView.register(UITableViewCell.self, forCellReuseIdentifier: cellIdentifier) menuTableView.dataSource = self menuTableView.delegate = self}
Then implement the datasource / delegate method :
// SideMenuViewController.swiftclass SideMenuViewController: UIViewController {// ...}extension SideMenuViewController : UITableViewDataSource { func tableView(_ tableView: UITableView, numberOfRowsInSection section: Int) -> Int { return 3 } func tableView(_ tableView: UITableView, cellForRowAt indexPath: IndexPath) -> UITableViewCell { let cell = tableView.dequeueReusableCell(withIdentifier: cellIdentifier, for: indexPath) switch indexPath.row { case 0: cell.textLabel?.text = "Profile" case 1: cell.textLabel?.text = "List" case 2: cell.textLabel?.text = "Moments" default: cell.textLabel?.text = "" } return cell }}extension SideMenuViewController : UITableViewDelegate { func tableView(_ tableView: UITableView, didSelectRowAt indexPath: IndexPath) { tableView.deselectRow(at: indexPath, animated: true) if let currentActiveNav = self.currentActiveNav, let mainVC = self.parent as? MainViewController { mainVC.hideSideMenu() let storyboard = UIStoryboard(name: "Main", bundle: nil) let profileVC = storyboard.instantiateViewController(withIdentifier: "ProfileViewController") currentActiveNav.pushViewController(profileVC, animated: true) } }}
Build and run the app, open the side menu and tap on any row, you should see this :

You have now implemented Twitter slide menu without using any library / Cocoapods 🎉! Container views helped us a lot on implementing the slide menu, now you can use one less library when you want to implement slide menu 🙌.